Mountain Laurel Handrails are the perfect complement to any county home, whether in the city or the mountains. Reusing wood is a green alternative to burning it as waste. Skilled craftsmen can assemble mountain laurel and rhododendron branches into items of beauty that impart the look and feel of the forest to your home. Read on to learn how you can make your own.
Measure the handrail location from post to post. You will need two 2x4s, two 1x4s and one 2×6 for each handrail section. Make a list of all the lumber you will need.
Paint or stain the dimensional lumber prior to assembly.
Secure two 2x4s to a surface making sure that they are 31 inches apart from top to bottom. For a total handrail height of 36 inches, handrails should be installed 3.5 inches above the floor.
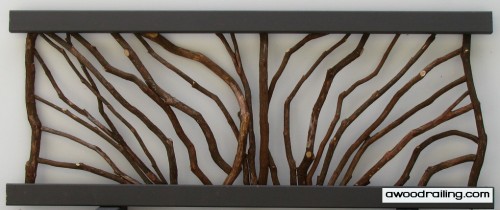
Cut a piece of mountain laurel to fit. Nail it to the top and bottom 2x4s with a 16-gauge finish nail gun.
Repeat step 4 making sure to weave the sticks over and under. Sometimes, they can be fastened to previously installed branches giving a more natural look. The laurel twigs should be nailed wherever they cross for greater structural stability.
The section of rustic wood railing is ready to be installed!
This is a simple way to add natural beauty to your rustic home decor. Mountain Laurel Handrails are great for interior applications as well as on exterior decks. Please remember to be careful when using power tools and nail guns.